Tech Tip: Simplify Index Creation Using File Names with PaperVision® Folder Monitor
Our technical experts show you how to help customers get more out of our free Folder Monitor file upload technology by automating the use of files names as indexes.

Tech Tip: Simplify Index Creation Using File Names with PaperVision® Folder Monitor
By Matthew Hodge, Technical Support Engineer
The free PaperVision® Folder Monitor makes it easy to automate the upload and indexing of electronic files and folders from a local file system into PaperVision® Enterprise, ImageSilo® or PaperVision®.com.
Did you know Folder Monitor’s functionality extends to automating the use of file names as indexes? This option is especially useful for files that contain index data in the file names or if using a scanner to output to directories with information included in the file and directory names.
Help customers get more out of the free Folder Monitor software utility by following these steps to automatically use files names as indexes:

Getting Started
To begin, make sure Folder Monitor is installed and a file upload job is available for use.
1. Create a job by clicking Create on the Job screen.
2. Type the job name and then click Create to enter the Edit Job screen and configure properties.
Configuring Job Properties
The Edit Job screen allows you to edit the Connection, Source, Project, Mapping, and Scheduling properties for the job. These options are explained below.
Connection: In the Connection section, specify your PaperVision Enterprise, ImageSilo or PaperVision.com URL and credentials. Once configured, click Next.
Source: In the Source section, you’ll need to specify the following:
- Source folder – The folder to monitor for files to upload.
- Exceptions folder – The folder where files will be moved if an exception occurs.
- Working folder - The folder where files are temporarily stored to process files.
There are other options here such as File Filters and whether you want to include files in sub-folders or if you would like to delete empty folders after import. Once finished configuring, click Next.
Project: In the Project section, specify the destination project and what index fields you would like to import using Folder Monitor. Once configured, click Next to move on to the Mapping section.
Mapping: In the Mapping section, configure the following:
- File segment delimiter: The character to be used to separate indexes in files names.
- Folder segment delimiter: The character to be used to separate indexes in folder names.
- Project index field mapping: The configuration for any given index included in the job that can have varying sources and configurations.
- File Segments: Staying in the Mapping section, look for the File Segment option under Source. This is where the indexing magic happens. Be careful when setting up your segments so you don’t end up with incorrect data in your indexes.
An example of proper configuration:
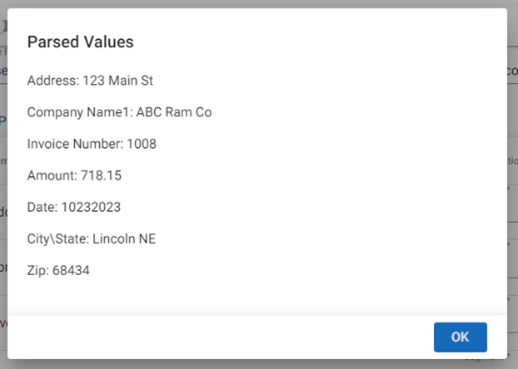
Let's assume we have a file with the following name: "123 Main Street_ABC RAM Co_1007_718.15_10232023_Lincoln NE_68501.txt." In this format, the file name contains several segments. For example, Address is segment one. Company Name is segment two. Invoice Number is segment three and so on.
To configure this example, simply match the index to the appropriate file segment and continue configuration until all of the indexes you want to use are configured. In the above example, when configuring the Address index field, set the source to File Segment and the Segment to 1.

Testing your configuration:
To ensure that everything is working properly, it is good practice to test your configuration. Here's how:
1. Click on the three dots ("...") next to the blue Test button.
2. Navigate and select a sample file for testing.
3. Click Test to trigger Folder Monitor to perform a test process. If your segments are configured correctly, you'll see a window pop up with the parsed index values.
Schedule: Once all of the settings have been configured, the only step left is to use the Schedule section to schedule when and how often to run the job. As part of its work of monitoring for and uploading files, Folder Monitor will populate index fields using the file name itself.
Conclusion
Folder Monitor builds on our past technology to make 24x7 secure, automated file and folder transfers easier than ever. Folder Monitor provides:
- Easier setup
- More user-friendly displays
- Direct access. No involvement of file transfer protocol (FTP) sites or outside database administrators are necessary.
And it’s FREE as part of Digitech Systems’ mission to bring you the best content management tools at the best price. Reach out to your client development representative with any questions.
Digitech Systems Technical Support